SAP RFC Integration through BizTalk
It has been a long while since I published some technical write-ups into my blog. Today, I will try to elaborate on Integration mechanism with SAP though BizTalk middleware. As you are aware, SAP is a self-contained and modular system. So, communicating with SAP is a complex process. You have to have basic understanding of SAP Modules and Data Query/Retrieval process. But, communicating to SAP through RFC function calls has made it even easier. You can communicate with SAP RFCs in three different ways:
1. Access SAP RFCs using WCF-SAP Adapter and SAP system credentials
2. Access SAF RFCs through exposed RFCs as ABAP web services
3. Access SAF RFCs through SAP Process Orchestrator, which is basically the SAP integration middleware
Today, I will concentrate on No. 2, which is to communicate with SAP through RFC Web Services via ABAP web services. To do that, you need to expose SAP RFCs as consumable web services. Please follow THIS to expose RFCs as ABAP web services and follow THIS link to expose RFCs as SOAP web services through SAP Process Orchestrator. But, in either ways you should be able to communicate with SAP with system credentials.
I will be using Visual Studio to demonstrate the BizTalk Orchestration development.
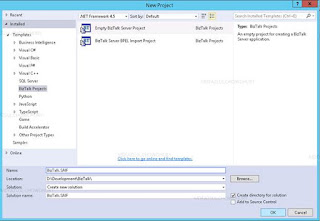
Step 1: Create a BizTalk Project
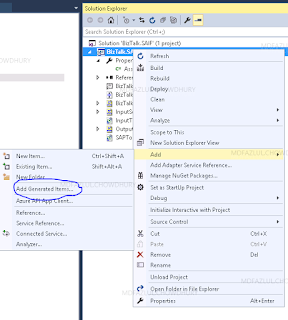
Step 2: Add Generated Items to the Project
Step 3: Consume WCF Service
Step 4: Consume Meta Data from a set of (*.WSDL) files
Step 5: Add the WSD Path and File Name
Step 6. Click Import and it will import the Service Description to the BizTalk Project and it will automatically create necessary Schema Definition for SAP Web Service, SAP Request Response Port Type and a Blank Orchestration file.
Step 7: Open up the Orchestration file and add the Receive, Transform, Send, Receive, Transform and Send shapes in to the blank orchestration in the following order
Step 8: Add a Schema (i.e. InputSchema.xsd) to the Solution for the Parameter Input file and add a Child Record (i.e. InputParameters) and add necessary Child elements to it.
Step 9: Add another Schema (i.e. OutputSchema.xsd) to the Solution for the Query output file and add a Child Record (i.e. Locations) followed by another child record (i.e. Location) for Looping through multiple item. Then add necessary Child elements to it.
Step 10: Open the Solution Window in Orchestration View and add the necessary Messages items and select appropriate Message Types (i.e. InputSchema /OutPutSchema /SAPRequest /SAPResponse)
- InputMessage:
- OutputMessage:
- RequestMessage:
-ResponseMessage:
Step 11: Add necessary Ports/Port Types as follows:
- Input parameter port (One Way Receive Port Type/Receiving Messages) - ParamReceivePort
- SAP Request/Response Port (Request Response Port Type/Sending a Request and Receiving a Response) – SAPRequestResponse, N.B. Sap Request response port type will be created while importing the WSDL. So, you need to select existing port type in this case.
- Output file port (One Way Send Port Type/Sending Messages) – WriteToFilePort
Step 12: Assign corresponding Message Types/Operations to ReceiveInput, SendRequest, ReceiveRequest and SendOutput. You will see that the Ports and Message Shapes are now connected.
Step 13: Update Message Constructed for 2 Transform Shapes:
Step 14: Click on first Transform Shape (i.e InputToRequest) of Construct Message shape (TransformFromXMLInputToSAPReq
Step 15: Define the first Mapping from Input Parameter to SAP Request. To do that Add Input File Schema (i.e. InputSchema) in the Source Schema pan and add SAP Request Schema (i.e. Z_I_MIA_LOC_LIST) in the destination schema pan and link associated elements on both sides
Step 16: Click on first Transform Shape (i.e ResponseToOutput) of Construct Message shape (TransformFromSAPResponseToOup
Step 17: Define the second mapping (i.e BizTalk.SAIF.SAPToFileMap) from SAP Response to Output. To do that add SAP Response Schema (i.e. Z_I_MIA_LOC_LISTResponse) in the source schema pan and add Output File Schema (i.e. OutputSchema) in the Destination Schema pan and link associated elements on both sides:
Step 18: Now, the orchestration is complete and ready to deploy. Now, we need to add application name/BizTalk Server name in the Deployment tab.
Step 19: Add a key file to make the assembly strongly typed.
Step 20: Now deploy the solution to BizTalk server. We need to open up BizTalk administration console and configure the BizTalk application that we have just deployed.
Step 21: Create a Receive port to receive input parameter file.
- Right click on Receive ports and select New->One-Way Receive Port
- Give it a name (ParamReceivePort)
- Click on Receive Locations->New
- Enter Receive Location Name (i.e. ParamReceivePortLocation), Type as FILE and Receive Pipeline as XML Receive.
- Click on Configure and select Receive Folder location and click "OK" and "OK" again to go back to Receive Port configuration
- Click on Inbound Maps and select the Input Schema
Step 22: Create a Send port to send request to SAP and get response back from SAP as well. Select "Static Solicit-Response Send Port" in this case.
- Give it a name (i.e. SAPRequestResponsePort)
- Select Type as WCF-Custom, Send Pipeline as XML Transmit and Receive Pipeline as XML Receive
- Click "Configure" button to configure WCF-Custom
- Enter URI and SOAP action header from the imported WSDL file for the SAP RFC. You will get it almost towards the end of the file
- Click on Binding tab and select "Basic" as Client Credential type
- Increase incoming message size (if needed) by clicking on BasicHttpBindingElemtent->maxR
- Enter SAP User ID and Password in the Credentials tab and click "OK"
- Then click on Filters to subscribe to Receive Port. This is necessary to read the input parameter file from Receive Port. Enter BTS.ReceivePortName == ParamReceivePort (i.e. the Receive Port Name)
- Click "OK" to save the SAP Request/Response port configuration
Step 23: Create a Send port to receive input parameter file.
- Right click on Send ports and select New-> Static One-Way Send Port
- Give it a name (WriteToFilePort), Type as FILE and Send Pipeline as XML Transmit.
- Click on Configure and select Send Folder location and click "OK" and "OK" again to go back to Send Port configuration
- Click on Inbound Maps and select the Input Schema
- Click on Filters and add BTS.SPName == SAPRequestResponsePort. This step is necessary to add a subscription to SAPRequestResponsePort to get the SAP Response into the Output port
Step 24: Now we are all set. We just have to configure the BizTalk application and select Host Instances and assign the Physical ports to Orchestration ports. So, right click on the application and select "Configure" and select corresponding items from dropdowns.
Step 25: You can generate the "Input Schema" file from Visual Studio by selecting "Generate Instance".
Step 26. Update the InputSchema file with required parameters and drop it into the Receive Location and you will see a new file with GUID has been created in to the Send Location.
VOILA !!!


Innomatics Research Labs is collaborated with JAIN (Deemed-to-be University) and offering the Online MBA in Artificial Intelligence & Business Intelligence Program. It is a sublime program of getting an MBA degree from one of the best renowned university – JAIN University and an IBM certification program in Data Science, Artificial Intelligence, and Business Intelligence from Innomatics Research Labs in collaboration with Royal Society London.
ReplyDeleteOnline MBA in Artificial intelligence from Jain University
content is super power Vivo Y51s
ReplyDeleteBest Computers and Electronic Recyclers in atlanta hard drive and data Recycling/refurbished is the best process to save things from waste. Recyclers is a way that reuses waste materials and makes them completely new. In a word, it is a Hard drive and data recovery process. You can recycle any kind of waste materials that you throughout. Electric materials are one of them. You can reuse the ruined electric materials, hard drive and data. For example, you can recycle an old computer and its hard drive and data
ReplyDeleteWe provide Classroom training on IBM Certified Data Science at Hyderabad for the individuals who believe hand-held training. We teach as per the Indian Standard Time (IST) with In-depth practical Knowledge on each topic in classroom training, 80 – 90 Hrs of Real-time practical training classes. There are different slots available on weekends or weekdays according to your choices. We are also available over the call or mail or direct interaction with the trainer for active learning.
ReplyDeleteThis airticle is very helpful for my self.
ReplyDeleteIf you interested this types of airticle, Then
click the following link word
SEO Agency,
If you contact with me, then you can
follow my social media by clicking
following link facebook.com
Laundry Service Near Me - Laundry Service Today shop that washes and iron clothes of customers. The laundrette providers of this service wash fabric in return for a specific amount of money. This service is most popular among the people who remain busy with theory daily life
ReplyDeleteGood blog and informative content. Thanks for sharing this blog with us.
ReplyDeleteMachine Learning Training in Hyderabad
Great post,Good blog and informative content
ReplyDelete7 best coding apps for kids who love coding
6 things you can do with Photoshop
google play store error rh-01
ReplyDeletewhat does the gb on a graphics card mean
is there a ps4 emulator
how to legally use copyrighted music on youtube
vidpaw review
nvidia control panel setting for best performance
cicada 3031
wentworth review
24inside is a news & information website publishing an extensive collection of the latest news & trending links on the web. Get access to daily news, politics, business, finance, science, technology, sport, travel, and much more.
ReplyDeleteBecome a data science expert by joining AI Patasala’s Data Science Course Training in Hyderabad program, where data science aspirants can learn data science concepts with practical knowledge.
ReplyDeleteData Science Course Training in Hyderabad
Data Science Institute in Hyderabad
RMF
ReplyDeleteRisk Management Framework - The management of organizational risk is essential for an organizations information security program. The Risk Management Framework provides an effective framework for selection of appropriate security controls for a system. RMF protects the individuals and assets of organization.
Thank you for this wonderful post.
ReplyDeleteOne of the augmented analytics platforms used for consumers' purposes. Attend a trained session on life sciences data and other patient analytics as a sole! Hurry up to take a weekly demo on life science by the best expertise on this field.
Pharmaceutical Business Intelligence Pharmaceutical Business Intelligence
Life Sciences Data Analytics Life Sciences Data Analytics
Enterprise Analytics Solutions Enterprise Analytics Solutions
WhizAi provides excellent Security Services in Chennai,
Business Intelligence For Life Sciences
Enterprise Analytics Solutions