Configuring Mixed Authentication in SharePoint
Step 1: Create a Membership Database to Store SQL membership and Roles
- Open Visual Studio Command Prompt
- Run ASPNET_REGSQL –A all –E. It will create a new database named aspnetdb into the local SQL Server
Step 2: Extend an existing Web Application for Form Authentication using following steps:
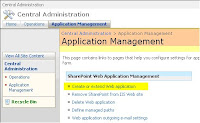
- Go to SharePoint Administration
- Click on Application Management
- Click on Create/Extend Web Application
- Click on Extend an existing web application
- Select the Primary Intranet Web Application. Enter the Host Header [ex. Mysite.Chowdhury.Com] and Select the port 80

- Select the Zone as Internet

- Click Ok to extend the existing intranet site to Internet Site with Forms Authentication
Step 3: Open Web.Config from SharePoint Administration Site and update the Web.Config according to the given instruction
Step 4: Open Web.Config from Extended SharePoint Application and update the Web.Config according to the following instruction [Only difference with Step 3 is AspNetSqlRoleProvider for Extended Sharepoint Application and AspNetWindowsTokenRoleProvider for SharePoint Administration’s Web.Config]
Step 5: Restart IIS in SharePoint Server [From Visual Studio Command Prompt issue IISRESET]
Step 6: Change Authentication Provider to Forms. Go to SharePoint Administration->Application Management->Authentication Providers->Internet
Then Change the Authentication to Forms and make sure that the Membership and Role provider are same as your Web.Config. Then, click on Yes on Enable Client Integration.
Step 7: Create Users/Roles/Rules in the Membership Database: Create an ASP .NET Web Application from Visual Studio and Edit the Web.Config file. Update the file with the following content and update the machineKey element from Extended SharePoint Application->Web.Config’s machineKey
Step 8: Go to Website Menu from Visual Studio 2005 and Click on ASP .NET Configuration or Go to Project Menu in Visual Studio 2008 and Click on ASP .NET Configuration. Then go to Security to Create/Modify User/Role/rules. For Anonymous access, please go to add new Access Rule. Here we will create a new user named: MyTestUser.
Step 9: Go to SharePoint Administration to grant access to the newly created user from the Membership Database.
- Go to Application Management
- Click on Policy for Web Application
- Select the Initial Web Application from the Web Application selection dropdown at the top right corner
- Click on Add User and select the appropriate Zone [The zone for the extended web application. i.e Internet]
- Click Next
- Type the user name MyTestUser in the Users Text box and choose the right permission for that user
- Click Finish to Create the User
Step 10: Log into your internet site and login as MyTestUser
Details: http://fbasp.codeplex.com/
- Open Visual Studio Command Prompt
- Run ASPNET_REGSQL –A all –E. It will create a new database named aspnetdb into the local SQL Server
Step 2: Extend an existing Web Application for Form Authentication using following steps:
- Go to SharePoint Administration
- Click on Application Management
- Click on Create/Extend Web Application

- Click on Extend an existing web application
- Select the Primary Intranet Web Application. Enter the Host Header [ex. Mysite.Chowdhury.Com] and Select the port 80

- Select the Zone as Internet

- Click Ok to extend the existing intranet site to Internet Site with Forms Authentication
Step 3: Open Web.Config from SharePoint Administration Site and update the Web.Config according to the given instruction
Step 4: Open Web.Config from Extended SharePoint Application and update the Web.Config according to the following instruction [Only difference with Step 3 is AspNetSqlRoleProvider for Extended Sharepoint Application and AspNetWindowsTokenRoleProvider for SharePoint Administration’s Web.Config]
Step 5: Restart IIS in SharePoint Server [From Visual Studio Command Prompt issue IISRESET]
Step 6: Change Authentication Provider to Forms. Go to SharePoint Administration->Application Management->Authentication Providers->Internet
Then Change the Authentication to Forms and make sure that the Membership and Role provider are same as your Web.Config. Then, click on Yes on Enable Client Integration.
Step 7: Create Users/Roles/Rules in the Membership Database: Create an ASP .NET Web Application from Visual Studio and Edit the Web.Config file. Update the file with the following content and update the machineKey element from Extended SharePoint Application->Web.Config’s machineKey
Step 8: Go to Website Menu from Visual Studio 2005 and Click on ASP .NET Configuration or Go to Project Menu in Visual Studio 2008 and Click on ASP .NET Configuration. Then go to Security to Create/Modify User/Role/rules. For Anonymous access, please go to add new Access Rule. Here we will create a new user named: MyTestUser.
Step 9: Go to SharePoint Administration to grant access to the newly created user from the Membership Database.
- Go to Application Management
- Click on Policy for Web Application
- Select the Initial Web Application from the Web Application selection dropdown at the top right corner
- Click on Add User and select the appropriate Zone [The zone for the extended web application. i.e Internet]
- Click Next
- Type the user name MyTestUser in the Users Text box and choose the right permission for that user
- Click Finish to Create the User
Step 10: Log into your internet site and login as MyTestUser
Details: http://fbasp.codeplex.com/

I love youг blog.. vеry nісe colors & theme.
ReplyDeleteDid you design this webѕite yourself or ԁid you hirе someone to do
it for you? Plz ansωeг bаcκ аѕ
I'm looking to construct my own blog and would like to know where u got this from. kudos
Have a look at my weblog; Soft serve ice cream maker